This post contains affiliate links.
Raising your desk height is more than a small change. It’s a smart step to help your body feel better and work better. When your desk is at the right height, your back and neck won’t hurt as much, and you can focus better on your work.
Keep reading, we have lots of useful tips to make your workspace better and make you feel more comfortable while you work. Let’s explore how simple changes can make a big difference.
Why You Should Consider Raising Your Desk Height
For a long time, everyone used desks of the same height. But now, things are changing. More and more people are using taller desks. Why is this happening?
Is it just a trend, or are there real good reasons to have a higher desk? Let’s look closely and discover what a taller desk can do for us.
- Reduces neck and back strain by ensuring proper posture.
- Prevents arm and hand discomfort, reducing the risk of repetitive strain injuries.
- Promotes alternating between sitting and standing, countering the negative effects of prolonged sitting.
- Enhances blood circulation, mitigating circulatory health issues.
- Maintains focus by minimizing discomfort-related distractions.
- Allows for task-specific desk height adjustments, enhancing comfort during various activities.
Improved health, boosted productivity, and a newfound sense of energy can transform your workday, making it more comfortable, efficient, and even enjoyable. Experiment, find what works for you, and unlock the full potential of your desk, both high and low.
Method 1: Use Furniture Risers
Furniture risers are small platforms or blocks made from various materials like plastic, wood, or metal. They are placed under each leg of your furniture to increase its height.
Pros of Using Furniture Risers
- Affordable: Costing around $10-$50, furniture risers are a budget-friendly solution compared to other desk-raising methods.
- Easy to Install: No tools or technical skills are required. You can set them up in minutes.
- Versatile: They come in various sizes and materials, catering to different preferences and desk types.
Cons of Using Furniture Risers
- Stability Concerns: If not chosen correctly, risers can make your desk wobbly, especially on uneven floors.
- Aesthetic Impact: Some users may find that risers do not blend well with their desk’s design.
- Height Limitation: Risers offer a fixed height increase, which may not be suitable for everyone’s needs.
How to Use Furniture Risers – Step by Step Guide
- Measure Up: Determine the desired height increase and choose risers accordingly.
- Clear the Clutter: Remove any items or cables from under your desk legs.
- Lift Off: Gently lift one leg of your desk at a time.
- Stack and Stabilize: Place the riser(s) on a flat, stable surface under the leg.
- Repeat and Rejoice: Lower the leg onto the riser, ensuring balance. Repeat for each leg.
- Test and Adjust: Check for wobbling and adjust riser placement if needed.
Additional Tips
- Consider non-slip risers for added stability.
- Check weight capacity to ensure they can support your desk and equipment.
- Use cable management features to keep cords organized.
- Risers can be a temporary solution before investing in an adjustable desk.
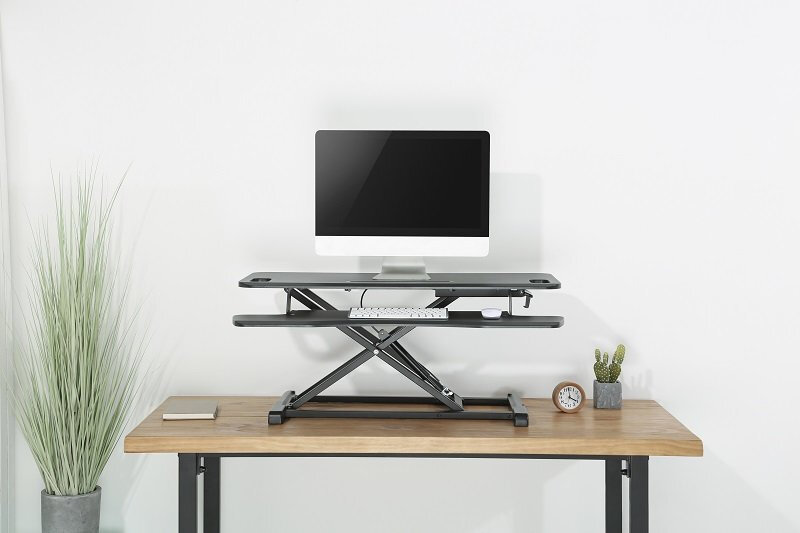
Method 2: Utilize a Desk Converter
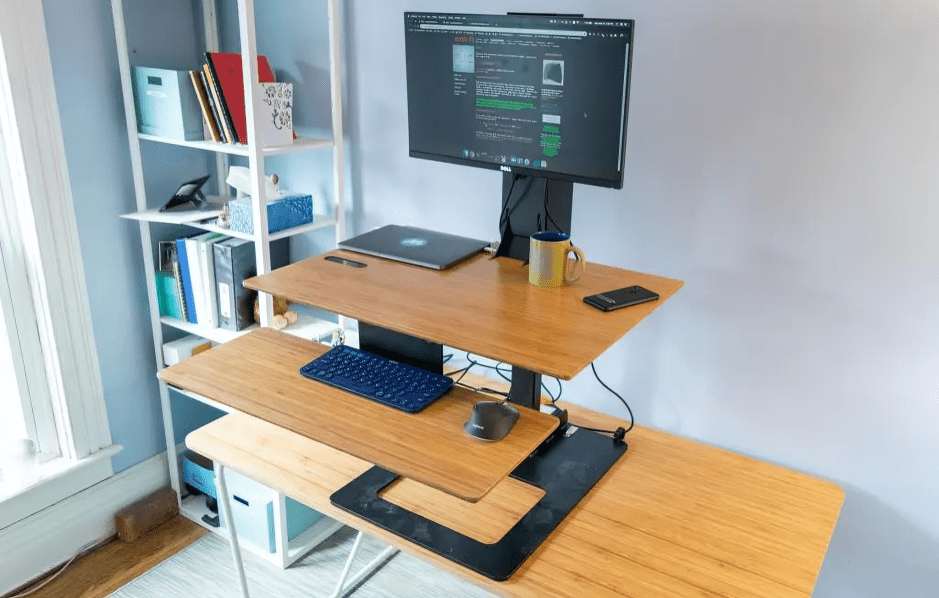
A desk converter is an adjustable platform that can be placed on top of a traditional desk. It typically features a mechanism that allows for easy height adjustment, accommodating both sitting and standing work positions.
Pros of Utilizing Desk Converter
- Health Benefits: Alternating between sitting and standing can reduce the risk of obesity, diabetes, cardiovascular disease, and cancer.
- No Desk Modifications Needed: Desk converters are an add-on to your existing desk, meaning no drilling or permanent changes are required.
- Portability: Many desk converters are designed to be portable, allowing you to move them if needed.
Cons of Using Desk Converter
- Workspace Limitation: Desk converters can reduce the usable workspace on your desk when in the sitting position.
- Stability Concerns: Some models may wobble or feel less stable, especially when fully extended.
- Cost: High-quality desk converters can be an investment, with prices often higher than other height adjustment solutions.
How to Use Desk Converter – Step by Step Guide
- Choose Your Converter: Select a model that suits your desk size, height requirements, and desired features.
- Set It Up: Follow the manufacturer’s instructions to assemble and install the converter on your desk.
- Adjust for Comfort: Experiment with different height settings to find the ideal ergonomic position for both sitting and standing.
- Integrate Your Equipment: Position your monitor, keyboard, mouse, and other accessories comfortably on the converter’s surface.
- Switch It Up: Alternate between sitting and standing throughout the day, ideally every 30-60 minutes.
Additional Tips
- Add a monitor arm to your converter for enhanced adjustability and screen positioning.
- A separate keyboard tray can optimize ergonomics and reduce wrist strain, especially when standing.
Method 3: Replace Current Desk Legs with Taller Ones
Replacing table legs involves removing the existing legs of your desk and installing new, taller legs. It is a more permanent solution to achieve the desired desk height. This method not only provides a stable base but also offers the opportunity to customize the look of your workspace.
Pros of Replacing Desk Legs
- Customization: You have the freedom to choose from a variety of styles, materials, and heights.
- Increased Stability: New legs, when properly installed, can offer more stability than add-on solutions like risers.
- Long-Term Solution: Unlike temporary fixes, replacing the legs offers a durable solution to desk height issues.
Cons of Replacing Desk Legs
- Complexity: The process can be more complex and time-consuming than other methods.
- Cost: Depending on the type of legs you choose, this method can be more expensive than using risers.
- Risk of Damage: Incorrect installation can damage the desk or result in an unstable work surface.
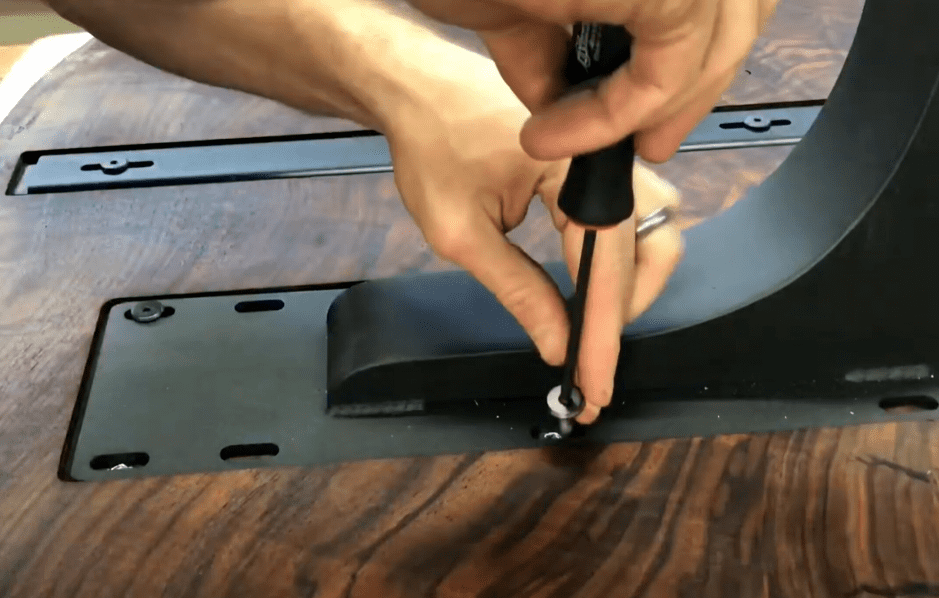
How to Replace Desk Legs – Step by Step Guide
- Measure Up: Determine the desired height increase and choose replacement legs accordingly.
- Gather Tools: Assemble a screwdriver, wrench, and any other necessary tools.
- Flip It Over: Carefully turn your desk upside down to access the underside.
- Remove Existing Legs: Unscrew the current legs, taking note of how they’re attached.
- Install New Legs: Secure the new legs in place, ensuring a tight fit and proper alignment.
- Flip and Enjoy: Gently turn your desk back over and appreciate at your handiwork!
Additional Tips
- Consider leg styles that complement your desk’s design and materials.
- Choose legs with adjustable feet for fine-tuning height and leveling.
- Test the stability of the desk after installation to ensure it’s secure.
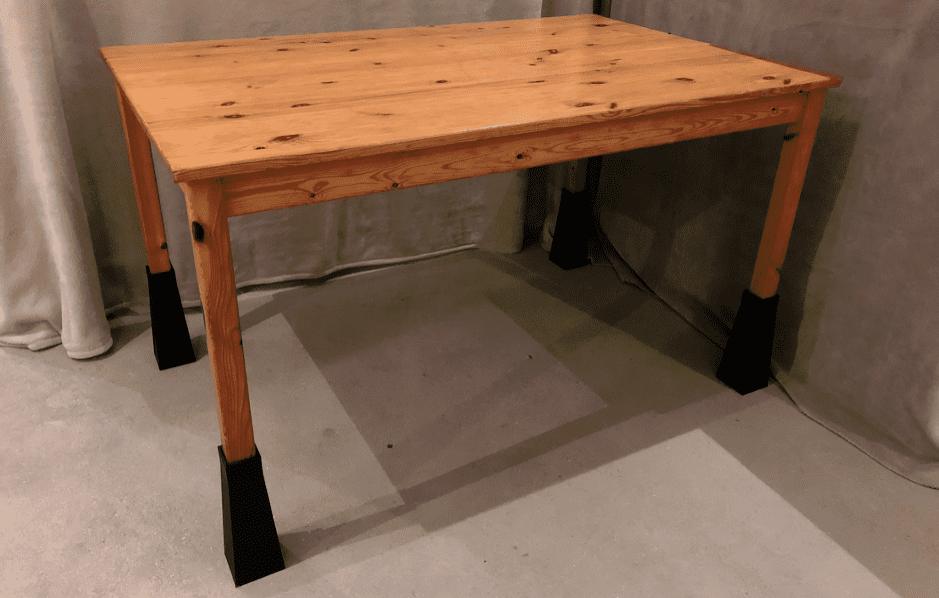
Method 4: Use Bun Feet for Desk Height Adjustment
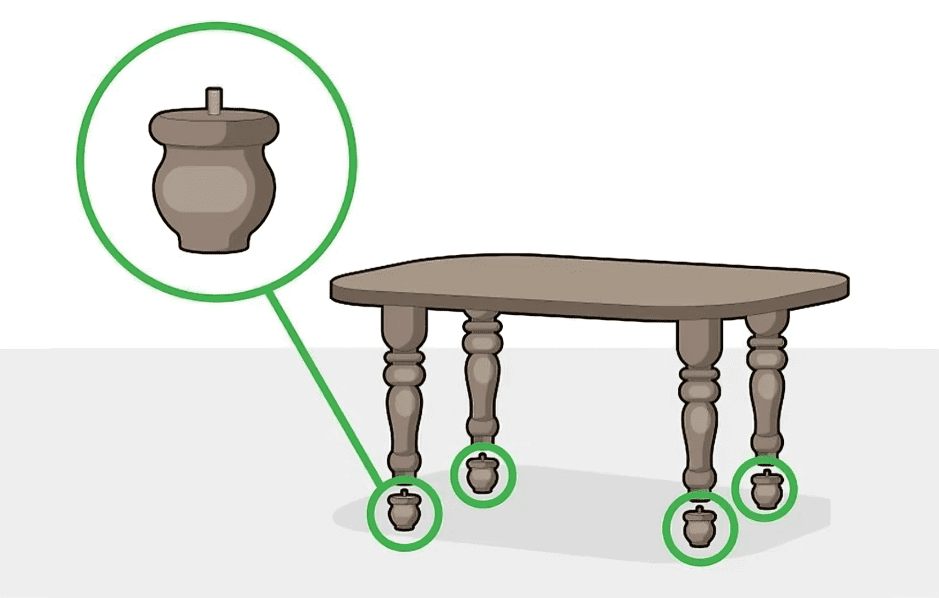
Bun feet are rounded, decorative feet typically made of wood or metal. They are named for their shape, which resembles a bun. This method involves attaching rounded, bun-shaped feet to the bottom of your desk legs, raising the height of your desk.
Pros of Using Bun Feet
- Enhanced Aesthetics: Bun feet can add a unique style and elegance to your desk.
- Stability: They offer a solid and stable base, especially if the desk’s weight is evenly distributed.
- Customization: Available in various materials and designs, bun feet allow you to personalize your workspace.
Cons of Using Bun Feet
- Installation Complexity: Attaching bun feet might require drilling and proper alignment, which can be challenging for some.
- Limited Height Adjustment: Unlike adjustable desk legs, bun feet offer a fixed height increase.
- Potential for Incompatibility: Not all desks may be suitable for adding bun feet, especially those with pre-existing structural limitations.
How to Use Bun Feet – Step by Step Guide
- Measure Up: Determine the desired height increase and choose bun feet that align with your ergonomic needs and desk style.
- Prep the Surface: Clean the bottom of your desk legs to ensure a secure attachment.
- Mark the Spot: Use a pencil to mark the placement of the bun feet on each leg, ensuring even distribution and alignment.
- Attach with Precision: Securely fasten the bun feet using either screws (for pre-drilled holes) or strong adhesive pads, following the manufacturer’s instructions.
- Test and Level: Once installed, gently test the desk’s stability and use adjustable bun feet (if available) to level the surface for optimal comfort.
Additional Tips
- Choose bun feet that complement your desk’s materials and design aesthetic for a cohesive look.
- Consider bun feet with felt pads to protect your flooring and prevent scratches.
- For heavier desks, opt for bun feet with a larger base or consider using multiple bun feet per leg for added stability.
Method 5: Use Wooden Extensions

Wooden extensions are pieces of wood, cut and shaped to fit your desk legs used to increase the height of your desk. They can be simple blocks or more elaborate shapes, depending on your preference and carpentry skills.
Pros of Using Wooden Extensions
- High Customizability: You can tailor the size, shape, and finish of the wooden extensions to meet your specific needs and preferences.
- Sturdy Support: Wood is a robust material that, when properly attached, can securely support your desk and its contents.
- Aesthetic Integration: Wooden extensions can be designed to blend seamlessly with your desk, preserving or enhancing its appearance.
Cons of Using Wooden Extensions
- Installation Effort: Attaching wooden extensions requires some carpentry skills, tools, and effort.
- Permanent Alteration: Unlike some other methods, adding wooden extensions is a more permanent change to your desk.
- Potential for Inaccuracy: Without precise measurement and cutting, wooden extensions can lead to an uneven or unstable desk.
How to Use Wooden Extensions – Step by Step Guide
- Measure Precisely: Get accurate measurements of both the desired height increase and your desk legs.
- Match Wood Style: Choose wood that complements your desk’s material and finish for a seamless look.
- Cut to Size: Use a saw to trim the extensions to the perfect length and width.
- Secure Connections: Create stable attachment points (like hanger bolts or dowels) to fasten the extensions to the legs.
- Attach Carefully: Align and attach the extensions with precision, ensuring a tight fit and level surface.
- Test and Adjust: Once installed, test the desk’s stability and refine the extensions as needed for comfort.
Additional Tips
- Use a drill to create pilot holes for screws, preventing wood splitting.
- Sand and finish the extensions to match the desk’s appearance.
- Consider using wood glue for added strength and stability.
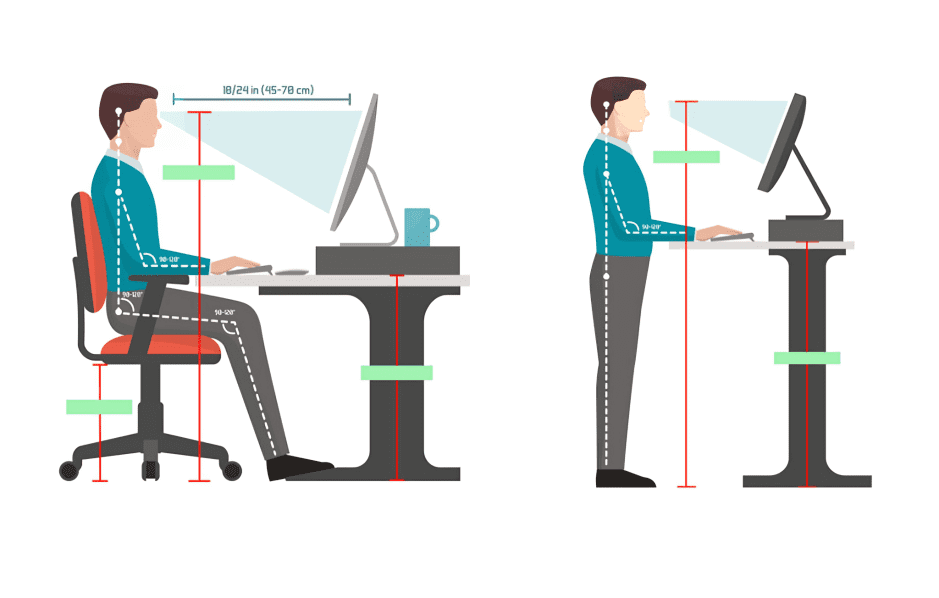
Method 6: Adjust Your Office Chair Height
Adjusting the height of your office chair is a fundamental yet effective way to ensure ergonomic alignment with your desk. It means altering the seat height so that your feet rest flat on the floor, your thighs are parallel to the ground, and your arms are even with the height of the desk.
Pros of Adjusting Your Office Chair Height
- Immediate Solution: Adjusting your chair height is a quick and straightforward way to improve your ergonomic posture.
- Cost-Effective: It doesn’t require any additional investment if you already have an adjustable chair.
- Flexibility: Allows for easy adjustments throughout the day as needed, catering to different tasks or preferences.
Cons of Adjusting Your Office Chair Height
- Limited by Chair Design: Not all chairs offer a wide range of height adjustments or may not go high or low enough for your specific needs.
- May Require Additional Support: Some individuals may need additional support, such as a footrest, if the chair cannot be lowered enough or if the desk is too high.
- Wear and Tear: Frequent adjustments can lead to wear and tear on the chair’s mechanism over time.
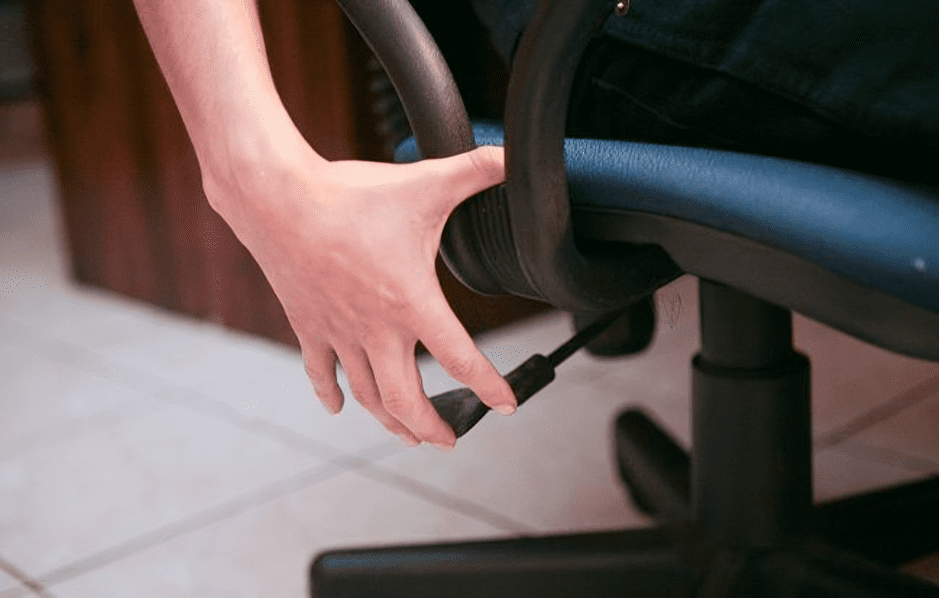
How to Adjust Chair Height – Step by Step Guide
- Sit Up Straight: Begin by sitting with your back straight and your feet flat on the floor.
- Locate the Lever: Find the height adjustment lever, typically located under the seat or on the side of the chair.
- Unlock and Raise: Unlock the lever and gently raise the seat until your thighs are parallel to the floor, and your knees are at a 90-degree angle.
- Check Elbow Angle: Ensure your elbows form a 90-degree angle when resting on the armrest.
Additional tips
- If your feet cannot rest flat on the floor even at the lowest chair height, use a footrest to maintain proper leg positioning.
- Ensure armrests are at a height that allows your shoulders to relax and your forearms to rest parallel to the floor.
Before You Go…
It’s clear that raising your desk height is more than just a trend—it’s a step towards a healthier, more comfortable, and productive workspace. Whether you choose risers, new legs, or a desk converter, each method offers its own blend of benefits, ready to transform your workday experience.
But there’s more to consider than all these methods. My previous article dives deeper into the pros and cons of using sit-stand desk. You’ll find insights on cost, ergonomics, and maximizing the potential of your elevated workspace.